写在前面
Spring容器
- 组件
- Servlet
- Service
- Dao
- 容器
- Servlet容器
IoC 和 DI
- Inversion of Control
- Dependency Injection
@Bean
- 组件不存在,异常:NoSuchBeanDefinitionException
- 组件不唯一,使用了getBean(Class),异常:NoUniqueBeanDefinitionException
- 使用getBeansOfType()
1
2
3
4
5
6
//组件注册
@Bean("zhangsan")
public Person zhangsan(){
    var person = Person.builder().age(10).sex(1).name("我是傻逼").build();
    return person;
}
组件创建是在容器创建过程中创建的,容器创建完成的时候,组件早已注册完成 组件是单例的
@Configuration
配置类,可以放置所有组件的定义和声明
@Service,@Controller,@Repository
以上都可以使用@Component代替,上面的三个注解底层都是Component,是给人看的,不是给机器看的
@ComponentScan扫描
@Import
我们想使用导入的包的类作为bean,由于导包是只读的 所以我们要么: 自己new一个,要不直接导入
1
2
3
4
5
6
7
8
@Bean
public NBClass nbclass(){
    return new NBClass;
}


//方法二直接导入
@Import(NBClass.Class)
@Scope
@Scope(“prototype”) 懒加载,多例 组件对象什么时候用什么时候创建
@Scope(“singleton”) 单实例,在容器创建之前就创建了 @Lazy 可以让单例模式变为懒加载
@Scope(“request”) @Scope(“session”)
FactoryBean
属于一个Class的bean,name是BYDFactory
1
2
3
4
5
6
7
8
9
10
11
12
13
14
15
16
17
18
@Component
public class BYDFactory implements FactoryBean<Car> {

    @Override
    public Car getObject() throws Exception {
        return new Car();
    }

    @Override
    public Class<Car> getObjectType() {
        return Car.class;
    }

    @Override
    public boolean isSingleton() {
        return true;
    }
}
@Conditional
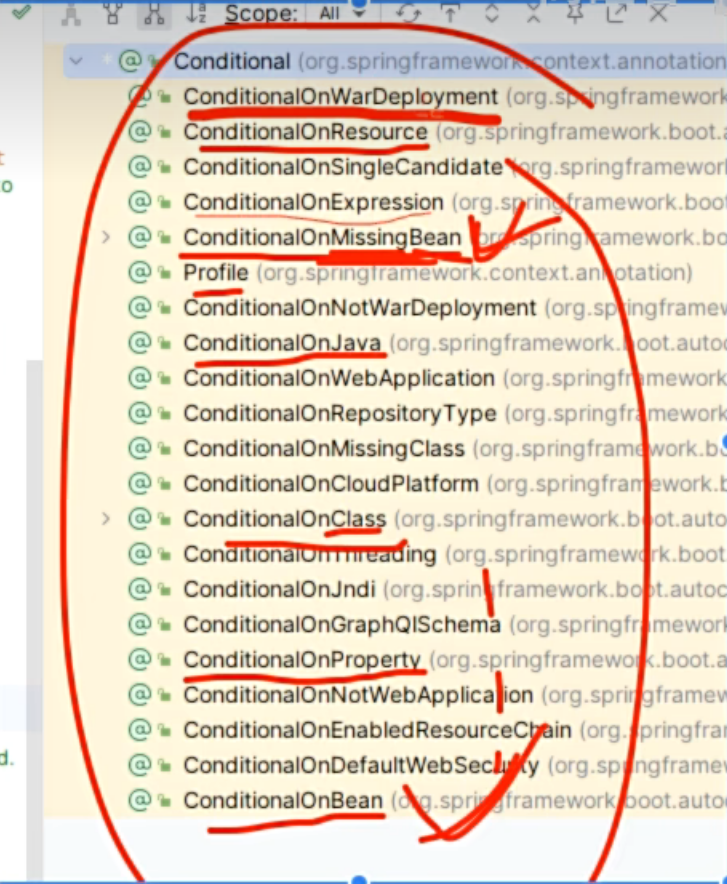 这个很好玩,spring实现了很多子类
1
2
3
4
5
6
@ConditionalOnResource(resources = "")
@Conditional(CarContional.class)
@Bean
public Car car1(){
    return new Car();
}
@Autowired自动装配
如果找到一个,直接注入,找到等多个,按照名字去找,变量名就是名字
1
2
3
4
5
@Autowired
List<Person> persons;

@Autowired
Map<String,Person> personMap;
@Resource也能进行自动装配,不过这个是jdk标准规定的东西。 而@Autowired是spring的,而且能开启(required=false),功能更强
@Qualifier(“”) @Primary
@Qualifier精确指定, @Primary指定默认组件,优先级最高 属性名对应优先级最低
利用有参构造器进行装配
spring推荐的方法
1
2
3
4
5
6
7
public calss UserDao{
    Dog haha;
    //spring会自动在容器里面找东西吃,然后扔给UserDao
    public UserDao(Dog dog){
        this.haha = dog;
    }
}
setter注入
其实还可利用setter进行注入,就是给setter上面标注@Autowired
1
2
3
public void setDog(@Qualifer("dog1") Dog dog){
    this.dog = dog ;
}
XXXAware感知接口
如果我想在一个类里面使用环境变量等东西,我可以实现Environment接口,然后在自定义一个field接受面量,这样就可以使用了
@Value注入值
1
2
3
4
5
6
7
8
@Value("字面值")

@Value("${dog.name:哈哈}") //默认从动态文件application.properties中取出来,可以用冒号赋值默认值
@PropertySource("classpath:cat.properties")  //注意这个注解是加载的意思,而不是仅用这个文件的意思,
// 是在原有文件之上再加载,所以理论上直接放在最外层或者Config层都行

@Value("#{SpEL}")  //表达式
@Value("#{T(java.util.UUID).randomUUID().toString()}")
数据源配置
如果我们有开发,测试,生产三套数据源 其实我们想想就知道我们可以用条件注解进行选择 @Profile(“”) 底层就是@Conditional
1
2
3
4
5
6
7
8
9
@Profile("dev")
@Profile("test")
@Profile("prod")
@Profile("default")  //必须得有一个default

@Profile({"dev",defalut})

//在application.properties中
spring.profiles.active = prod //即可切换
生命周期
默认单例模式:
构造器 //创建周期
->postProcessBeforeInitiallization
->@Autowired set属性注入->@PostConstruct ->afterPropertiesSet->init // 初始化周期
->postProcessAfterInitiallization
->容器创建,运行中 //运行周期
->@Predestroy->destroy->destory方法 //销毁周期
- InitializingBean: afterPropertiesSet
- DisposableBean : destroy
- @PostConstruct
- @Predestroy
- BeanPostProcessor : 外挂修改器,
- postProcessBeforeInitiallization
- postProcessAfterInitiallization
上面这俩方法是一个统一的拦截器,拦截所有人
举例
- AutowiredAnnotationBeanPostProcessor 我们自己研究源码,实现了一个@UUID的注解,具体见手撕源码
AOP事务
Aspect Oriented Programming 面向切面编程
静态代理类
我们对每一个实现类都要去创建一个代理实例,这样使得代码更加复杂 虽然使用到了代理技术,但是依旧差强人意
动态代理类
优点: 在运行时才确定代理对象 缺点: 带的对象必须有接口
1
2
3
4
5
6
7
8
9
10
11
12
13
14
15
16
17
18
public class DynamicProxy {

    public static Object getDynamicProxy(Object obj){
        var proxyInstance = Proxy.newProxyInstance(
          obj.getClass().getClassLoader(),
          obj.getClass().getInterfaces(),
                (proxy,method,args) -> {
                    System.out.println("在你执行之前:");
                    var result = method.invoke(obj,args);
                    System.out.println("在你执行之后");
                    return result;
                }
        );

        return proxyInstance;
    }
}
封装LogUtil
AOP
- 前置通知
- 返回通知
- 异常通知
- 后置通知
切入表达式的写法:
1
2
3
4
5
6
7
8
9
10
11
12
13
14
15
16
17
18
19
20
21
22
23
24
25
26
27
28
29
30
31
32
33
34
35
36
37
38
39
40
41
42
43
44
45
46
47
package com.hzyxsj.javassmaop.aspect;

import org.aspectj.lang.annotation.*;
import org.springframework.scheduling.annotation.Async;
import org.springframework.stereotype.Component;

/**
 * 作者:宇宙超级无敌大马猴
 * 姓:亥
 * 字:子曜
 * 号:栖逸居士
 * 版本号:随缘
 */

@Component
@Aspect
public class LogAspect {
    @Before("execution(int add(int,int))")
    public void logBefore(JoinPoint joinpoint){
        System.out.println("this is the logBefore");
    }
    @AfterReturning(value ="execution(int add(int,int))",returning = "result")
    public void logAfterReturning(JoinPoint joinpoint,Object result){
        System.out.println("this is the logAfterReturning");
    }

    @AfterThrowing(value = "execution(int add(int,int))",
    throwing = "e")
    public void logAfterThrowing(JoinPoint joinpoint,Exception e){
        System.out.println("this is the logAfterThrowing");
    }
    @After("execution(int add(int,int))")
    public void logAfter(JoinPoint joinpoint){
        System.out.println("this is the logAfter");
    }

}
//切入点表达式的写法
execution(方法的全签名)
[public] int [com..Class].MethodName(int,int) [throw]
//要好好写切面表达式,不然就炸了
//其他写法
//within this  target都不重要,我都听着睡着了
//重点  args
@Before(execution(args(int,int)))
//这里定义切面的方式非常多
//老师讲的比较乱,所以以后可以补一补这里
增强器链: 切面中的所有方法其实就是增强器,他们被组织成一个链路放到集合中,
流程:前置->目标方法->返回->结束方法 前置->目标方法->异常返回->结束方法
对于切入面,你的返回修饰符和返回值没有规定,但是参数有严格规定 如果想拿到信息,就用切入点(JoinPoint joinPoint)
1
2
3
4
5
6
7
8
9
10
11
@Pointcut("切入点表达式")
public class pointCut(){}

@Before(value="pointCut()")

//多切面如何运行
//相当于套娃,层层嵌套
  前置1 ->前置2->返回或异常2->后置2->返回或异常1->后置1
//对于类型名一般默认按照首字母排序
//但我们可以手动排序
@Order(1)  //数字越小,优先级越高,越是外层
工具类
- AnnotationUtils工具类
- ClassUtils
- TypeUtils
- ReflectionUtils
源码
Sping如何找组件,三级缓存机制
- 先去singletonObject单例对象池(成品区)
- earlySingletonObjects去早期单例对象池里面找(半成品区)
- 加锁,再去上面两个地方再找一次
- singtonFactories去单例工厂找(最后才会用工厂制造)
3和4即为三级缓存机制
@Aroud
环绕通知, 如果不加Order排序,环绕就在最外层
1
2
3
4
5
6
7
8
9
10
11
12
13
14
15
16
17
18
19
20
21
22
@Aspect
@Component
public class LogAround {
    @Pointcut("execution(int add(int,int))")
    public void getCut(){
    }
    @Around("getCut()")
    public  Object aroundlog(ProceedingJoinPoint pjp) throws Throwable {
        Object[] args = pjp.getArgs();
        System.out.println("进行前置通知");
        Object result = null   ;
        try {
            result = pjp.proceed(args);
            System.out.println("this is the AfterReturning");
        } catch (Throwable e) {
            System.out.println("this is the AfterThrowing Around");
        } finally {
            System.out.println("this is the After Around");
        }
        return result;
    }
}
自动配置数据源
1
2
3
4
5
6
spring.datasource.url=jdbc:mysql://localhost:3306/spring_tx
spring.datasource.username=root
spring.datasource.password=123456
spring.datasource.driver-class-name=com.mysql.cj.jdbc.Driver

//自己写个@Autowired就拿到Datasource了
事务
@EnableTransacctionManagement @Transactional 原理:
- 事务管理器TransactionManager 控制提交和回滚
-
事务拦截器TransactionInterceptor 控制何时提交和回滚
- timeout 超时时间
这个timeout只记录到最后一次dao操作的时间,如果是dao之后执行了很长时间其他代码,不会造成超时
- isolation 隔离级别
- readOnly = true
可以开启只读优化,因为读不需要事务
- RollbackFor = {IOException.class}
指明哪些异常需要回滚,不是所有异常都会造成回滚 回滚的默认机制:运行时异常回滚,编译异常不回滚 使用rollbackFor是额外指定可以回滚的异常
- noRollbackFor = {}
和上面相反
- 隔离级别isolation
- READ_
- 脏读
- 不可重复读
- READ_COMMIT
- 不可重复读
- REPEATBLE_READ (快照读,mySql默认)
- 幻读
- READ_
- 传播行为Propagation
| 传播行为 | 是否新建事务 | 是否加入事务 | 无事务时表现 | 异常时影响 |
|---|---|---|---|---|
| REQUIRED | 可能 | 是 | 新建事务 | 整体回滚 |
| SUPPORTS | 否 | 可选 | 非事务 | 仅当前 |
| MANDATORY | 否 | 必须 | 抛异常 | 整体 |
| REQUIRES_NEW | 是 | 否 | 新建事务 | 独立 |
| NOT_SUPPORTED | 否 | 否 | 非事务 | 无回滚 |
| NEVER | 否 | 禁止 | 正常 | 抛异常 |
| NESTED | 可能 | 是 | 新建事务 | 局部回滚 |
小事务和大事务公用一个事务,小事务自己的设置失效,比如timeout,只能看大事务的
SpringMVC
MVC
1
2
3
4
5
6
7
8
9
10
11
12
13
14
15
16
17
18
19
20
21
22
23
@Controller
@ResponseBody
//这俩可以合体,标在类上
@RestController

@RequestMapping("/hello")  //路径映射
@RequestMapping("/hello?") //任意一个字符
@RequestMapping("/hello*")  //任意多个字符
@RequestMapping("/hello**")  //任意层级
//精确优先
//属性限定
value = ""
// GET,HEAD,POST,PUT,PATCH,DELETE,OPTIONS,TRACE
method = {RequestMethod.POST,RequestMethod.GET}

params = "username"  //必须给我一个username
params = "age=18"   //必须有给我age=18
params = {"!username"}

headers = {"haha"}

consumes = "application/json"
consumes = "text/html" //必须携带数据
Http请求
http端口就是80,https端口是443
- protocol
- Domain Name
- Port
- Path
- Parameters
- Anchor
示例
获取参数的方法,直接使用相同变量名在方法参数中,就直接能获取到
1
2
3
4
@RequestParam("Username") String name //默认必须携带
@requestParam(value = "Password", required = false) String password
@requestParam(value = "Password", defaultValue = "66666") String password
- POJO封装 如果参数是一个POJO,底层会自己封装进去Field 每个参数都是非必须的
- 其他获取
1
2
3
4
5
6
7
8
9
10
11
12
13
14
15
16
17
18
19
20
21
22
23
24
25
26
27
28
29
//请求头
@RequestHeader("host") String host

//cookie获取
@CookieValue("ck") String ck

//POJO支持级联封装


//获取请求体数据json变为POJO
(@RequestBody Person person)

//文件上传
@RequestParam("headerImg") MultipartFile headerImgFile,
@RequestParam("lifeimg") MultipartFile[] lifeimgs

String originalname = headerImgFile.getOriginalFilename();
//还可以进行许多操作
headerImgFile.transferTo(new File(path));  //直接干啦

//SpringMCV默认有上传文件大小1MB
//自己改配置spring.servlet.multipart.max-file-size=1GB

(HttpEntity<Person> entity) //直接拿到整个请求
entity.getBody();   //泛型就是请求体的类型
entity.getHeaders();


//支持你的servelt
response
1
2
3
4
5
6
7
8
9
10
11
12
13
14
15
16
17
18
19
20
21
22
23
24
25
26
27
28
//返回json,MVC会自己转json
@ResponseBody  //已经封装到RestController里面了
return POJO;
return Map;

//文件下载
@GetMapping("/download/stream")
public ResponseEntity<InputStreamResource> downloadStream() throws IOException {

    File file = new File("path");
    InputStreamResource resource =
            new InputStreamResource(new FileInputStream(file));

    String encodedFileName = URLEncoder.encode("中文.txt", StandardCharsets.UTF_8).replaceAll("\\+", "%20");

    return ResponseEntity.ok()
            .contentType(MediaType.APPLICATION_OCTET_STREAM)
            .contentLength(file.length())
            .header(HttpHeaders.CONTENT_DISPOSITION,
                    "attachment; filename*=UTF-8''" + encodedFileName)
            .body(resource);
}


//页面跳转
Thymeleaf

这个直接跳过了,后面应该不可能了解这个了
RESTful 资源状态转移
Resource Representational State Transfer
| URI | 请求方式 | 请求体 | 作用 | 返回数据 |
|---|---|---|---|---|
/employee/{id} |
GET | 无 | 查询某个员工 | Employee JSON |
/employee |
POST | employee JSON | 新增某个员工 | 成功 / 失败状态 |
/employee |
PUT | employee JSON | 修改某个员工 | 成功 / 失败状态 |
/employee/{id} |
DELETE | 无 | 删除某个员工 | 成功 / 失败状态 |
/employees |
GET | 无 / 查询条件 | 查询所有员工 | List |
/employees/page |
GET | 无 / 分页条件 | 分页查询员工 | 分页数据 JSON |
Controller->Service->Dao
Service层经常在干嘛,就是再把Dao封装了一层,作为一个代理 我可以把controller传来的数据进行再次处理,比如进行非空处理
1
2
3
4
5
6
7
8
9
10
11
12
13
14
15
16
17
18
19
20
21
22
23
24
25
26
27
28
29
30
31
32
33
34
35
36
37
38
39
40
41
42
43
44
45
46
47
48
@GetMapping(value = "/employee/{id}")
public String get(@PathVariable Long id)

//封装返回数据
@Data
public class R<T> {
    private int code;
    private String msg;
    private T data;

    private R(int code, String msg, T data) {
        this.code = code;
        this.msg = msg;
        this.data = data;
    }

    public static <T> R<T> ok(T data) {
        return new R<>(ResultCode.SUCCESS.getCode(),
                       ResultCode.SUCCESS.getMsg(),
                       data);
    }

    public static <T> R<T> fail(ResultCode code) {
        return new R<>(code.getCode(), code.getMsg(), null);
    }
}

public enum ResultCode {

    SUCCESS(200, "成功"),
    PARAM_ERROR(400, "参数错误"),
    UNAUTHORIZED(401, "未登录"),
    FORBIDDEN(403, "无权限"),
    NOT_FOUND(404, "资源不存在"),
    SERVER_ERROR(500, "服务器异常");

    private final int code;
    private final String msg;

    ResultCode(int code, String msg) {
        this.code = code;
        this.msg = msg;
    }

    public int getCode() { return code; }
    public String getMsg() { return msg; }
}
跨域问题
http://localhost http”//localhost:8080 上面这两个甚至也算是跨域请求 @CrossOrigin 允许跨域请求
拦截器HandlerIterceptor
拦截器是给类配置的,实现HandlerIterceptor接口
1
2
3
4
5
6
7
8
9
10
11
12
13
14
15
16
17
18
19
20
21
22
23
24
25
26
27
28
29
30
@Component
public class Myinterpretor implements HandlerInterceptor {
    @Override
    public void postHandle(HttpServletRequest request, HttpServletResponse response, Object handler, @Nullable ModelAndView modelAndView) throws Exception {
        System.out.println("this is the postHandle method");
        HandlerInterceptor.super.postHandle(request, response, handler, modelAndView);
    }

    @Override
    public boolean preHandle(HttpServletRequest request, HttpServletResponse response, Object handler) throws Exception {
        System.out.println("this is the preHandle method");
        return HandlerInterceptor.super.preHandle(request, response, handler);
    }
}

//要使用拦截器,首先要添加拦截器,我们使用配置类
@Configuration
public class MyConfiguration implements WebMvcConfigurer {
    @Autowired
    Myinterpretor interpretor;
    @Override
    public void addInterceptors(InterceptorRegistry registry) {
         registry.addInterceptor(interpretor).addPathPatterns("/**");
    }
}


//多个拦截器
pre顺序执行
post倒序执行
注意WebConfiguration
声明式异常处理
@ExceptionHandler(ArithmeticException.class)
1
2
3
4
5
6
7
8

@ExceptionHandler(ArithmeticException.class)
public String ArithmeticExceptionHandler(ArithmeticException ex){
    System.out.println("this is ArithmeticException");
    return ex.getMessage();
}

//但是这个只能在一个类中使用,出了类就不行了
全局处理异常@ControllerAdvice
1
2
3
4
5
6
7
8
9
@Configuration
public class MyConfiguration implements WebMvcConfigurer {
    @Autowired
    Myinterpretor interpretor;
    @Override
    public void addInterceptors(InterceptorRegistry registry) {
         registry.addInterceptor(interpretor).addPathPatterns("/**");
    }
}
异常处理流:本类处理->全局处理->SpringBoot底层兜底
在一些业务中,我们更希望遇到一些业务上的问题的时候,不仅仅是空值处理,我们更希望你可以抛出异常,通知上层组件。 我们更希望能够抛出自定义异常。
1
2
3
4
5
6
7
8
9
10
11
12
13
14
15
16
17
18
19
20
21
22
23
24
25
26
27
28
29
30
31
@Getter
public class BizException extends RuntimeException {

    private final String code;
    //不用写msg , 因为RuntimeException 自带有这个msg字段
    public BizException(BizExceptionEnum bizEnum) {
        super(bizEnum.getMsg());
        this.code = bizEnum.getCode();
    }

    public BizException(BizExceptionEnum bizEnum, Throwable cause) {
        super(bizEnum.getMsg() );
        this.code = bizEnum.getCode();
    }
}

@Getter
public enum BizExceptionEnum {

    ORDER_NOT_EXIST("100", "订单不存在"),
    PARAM_ERROR("400", "参数错误");

    private final String code;
    private final String msg;

    BizExceptionEnum(String code, String msg) {
        this.code = code;
        this.msg = msg;
    }
}
数据校验
JSR303 为Bean进行校验
1
2
3
4
5
6
7
8
9
10
11
12
13
14
15
16
17
18
19
20
21
22
23
24
25
26
27
28
29
30
31
32
33
34
35
36
37
38
39
40
41
42
43
44
45
46
47
48
49
50
51
52
53
54
55
56
57
58
59
60
61
62
63
64
65
66
67
68
public class Person {
    @NotBlank(message="不能啥也没有")
    private String name;

    @NotNull
    @Max(value= 150 ,message = "不能大于150岁")
    @Min(value = 0 ,message = "不能太小了 ")
    private int age;


    @Email
    private String email;
}

//注意以上还没开启校验,需要在方法参数处使用@Valid
public void test(@RequestBody @Valid Person person,BindingResult result){
    if(result.hasErrors()){
        return ok();
    }
    Map<String,String> errorMap = new HashMap<>();
    for(FieldError fielderror:result.getFieldErrors){
        String field = fielderror.getField();
        String message = fielderror.getDefaultMessage();
        errorsMap.put(field,message);
    }
    return error(......,errorMap)
}
//上面这种方式不好,不方便
//我们不需要写,因为我们有全局异常处理器
    @ExceptionHandler(MethodArgumentNotValidException.class)
    public String exceptionHandler(MethodArgumentNotValidException e) {
        BindingResult bindingResult = e.getBindingResult();
        Map<String,String> errorMap = new HashMap<>();
        for(FieldError fielderror : bindingResult.getFieldErrors()){
            String field = fielderror.getField();
            String message = fielderror.getDefaultMessage();
            errorMap.put(field,message);
        }
        return errorMap.keySet().toString();
    }
//直接这样封装全局的就好了
//对于异常的匹配,底层默认是精确匹配,越精确,越匹配,


//我们可以写正则表达式
@Pattern(regexp="",message="")


//自定义校验注解
//这里了解一下有这种需求就好了,实际上我感觉挺复杂


//国际化 i18n
@NotNul(message ="{去配置文件里面拿}")  //放在message.properties里面
配置不同语言的properties
message_zh_CN.properties

//分组校验
// 我们会说,在CRUD不同场景都会有不同的参数校验
//但是把各种注解标在field的脑子上面,各种功能放在一起不好
//所以我们有TO,DAO,VO等等
BeanUtils.copyProperties(employee,vo);
List<EmployeeRespVo> result = employees.stream().
        map(employee -> {
            var vo = new EmployeeRespVo();
            BeanUtils.copyProperties(employee,vo);
            return vo;
        })
推荐文章1:各种O傻傻分不清
接口文档
- Swagger : 遵循OpenAPI规范
- Knife4j :增强Swagger
1
2
3
4
@Tag(name = "写在类上,如:员工管理")
@Operation(summary = "add一个新员工,写在方法上")
@Schema(description = "员工表,放类上")
@Schema(description = "员工id,放field上")
日期处理
@JsonFormat(pattern = “” ,timezone=”GMT+8”)
SpringMVC源码
先跳过了
Mybatis
环境配置 快速入门
spring.datasource.url = .username = .password = .dirver =
1
2
3
4
5
6
7
8
9
@Mapper
public interface EmpMapper{

}
//绑定一个xml文件,一个标签就是一条sql
//注意,如果不开启驼峰映射,你就需要自己去起别名了


//注意配置mabatis.mapper-localtions = classpath:mapper/**.xml
- 导入mybatis
- 配置数据源(aoolication.properties)
- 编写JavaBean
- 编写Mapper接口,@Mapper,xml实现(安装mybatisx插件)
- @Mapper后面可以用MapperScan替代
- mapper文件配置sql
- 配置mapper文件位置
- logging.level.com.包名.mapper = debug //打印sql语句
功能实现
- 主键回显 useGenerateKeys=”true” keyProperty=”id”
- 开启驼峰映射 mybatis.configuration.map-underscore-to-camel-case=true
- #{}与${} 编译与预编译的关系
1
2
3
4
5
6
7
var connection = dataSource.getConnection();
// #{} 底层预编译
String sql1 = "select * from user where username = ? and password = ?"
PreparedStatement preparestatement = connection.prepareStatement(sql1);
preparestatement.setString(1,"admin");

// ${} 底层字符串拼接,有sql注入的风险
但是比如把table_name作为参数,#{}预编译的方式无法实现,只能使用${}
防止SQL注入
复杂参数取值
| 传参形式 | Mapper 方法示例 | SQL 中取值方式 |
|---|---|---|
| 单个参数(普通类型) | getEmploy(Long id) |
#{id} |
| 单个参数(List 类型) | getEmploy(List<Long> id) |
#{id[0]} |
| 单个参数(对象类型) | addEmploy(Employ e) |
#{属性名} |
| 单个参数(Map 类型) | addEmploy(Map<String,Object> m) |
#{key} |
| 多个参数(无 @Param) | getEmploy(Long id, String name) |
#{arg0} / #{param1}(旧版/不推荐) |
| 多个参数(有 @Param) | getEmploy(@Param("id") Long id, @Param("name") String name) |
#{id}、#{name} |
| 扩展(混合参数) | 见下 | 见下 |
1
2
3
4
5
6
7
getEmploy(
    @Param("id") Long id,
    @Param("ext") Map<String, Object> m,
    @Param("ids") List<Long> ids,
    @Param("e") Employ e
)
- 返回的是List的话,resultType = 泛型
- 返回是Map,记得用@Mapkey(“id”)指定key是什么,resultType = 泛型
框架底层很喜欢使用无参构造器,所以一定记得写无参构造器
ResultMap自定义封装
我们常常封装,要么就是名称一致,要么就是驼峰映射,其实还有高手
1
2
3
4
5
6
7
8
//自定义规则,如果我们遇到特别复杂的字段名就可以这样
<resultMap id="Employee" type="com.hzyxsj.bean.Employee">
    <id column="id" property="id" javaType="int" jdbcType="varchar"/>
    <result column="emp_name" javaType="empName"/>
</resultMap>
<select id="getEmployeeById" resultMap="Employee">
    select * from  `t_emp` where id = #{id}
</select>
当然,resultMap当然不只是来做这个的,比如多表联查,我肯定用不了驼峰映射,我得使用
- collection标签:表示一对多
- association标签: 一对一
1
2
3
4
5
6
7
8
9
10
11
12
13
14
15
16
17
18
19
20
21
22
23
24
25
26
27
28
29
30
31
32
33
34
<resultMap id="OrderMP" type="com.hzyxsj.bean.Order">
    <id column="id" property="id"/>
    <result column="address" property="orderAddress"/>
    <result column="amount" property="orderAmount"/>
    <result column="customer_id" property="customerId"/>
    <association property="customer" javaType="com.hzyxsj.bean.Customer">
            <result property="customerName" column="customer_name"/>
            <result column="phone" property="customerPhone"/>
    </association>
</resultMap>
<select id="getorderByID" resultMap="OrderMP">
    select  o.*,c.id customerId,
            c.customer_name  ,c.phone
    from t_order o  left join t_customer c on c.id = o.customer_id
    where o.id = #{orderid}
</select>


<resultMap type="com.hzyxsj.bean.Customer" id="CustomMP">
    <id property="id" column="customer_id"/>
    <result property="customerPhone" column="phone"/>
    <result property="customerName" column="name"/>
    <collection property="orders" javaType="list" ofType="com.hzyxsj.bean.Order">
        <result property="orderAddress" column="address"/>
        <result property="orderAmount" column="amount"/>
        <result property="id" column="id"/>
    </collection>
</resultMap>
<select id="findAllOrdersByCustomerId" resultMap="CustomMP">
    select  o.*  , c.phone ,c.customer_name name  from t_customer c
        left join t_order o on o.customer_id = c.id
    where  c.id = #{customerId}
</select>
这里我补充一句,什么时候用多表联查,什么时候用VO。 概括来说,我们从数据库拿来的东西,最好用多表联查, 我们返回给前端的数据,最好用VO去屏蔽掉敏感字段。
自动分步查询(子查询)
1
2
3
4
5
6
7
8
9
10
11
12
13
14
15
16
17
18
19
20

<collection property  ofType  select="调用另一个方法"  column="传参"  >
column= "{cid=id,name=custome_name}"

    <resultMap id="CusAndOderMP" type="com.hzyxsj.bean.Customer">
        <id column="id" property="id"/>
        <result column="customer_name" property="customerName"/>
        <result column="phone" property="customerPhone"/>
         <collection property="orders" ofType="com.hzyxsj.bean.Order" column="id"
          select="findAllOrders" >

         </collection>
    </resultMap>
    <select id="findAllOrdersAndCustomersById" resultMap="CusAndOderMP">
        select * from t_customer where id = #{customerId}
    </select>

    <select id="findAllOrders" resultType="com.hzyxsj.bean.Order">
        select * from t_order where customer_id= #{id}
    </select>
延迟加载
1
2
mybatis.configuration.aggressive-lazy-loading=false
mybatis.configuration.lazy-loading-enabled=true
动态SQL
如果我想查
- if
- where
- set
- trim: 替换where和set,自动去除and和逗号
- choose,when,otherwise
- foreach : 批量查询,批量插入,批量修改(开启数据库多sql支持)
- jdbc:mysql://localhost:3306/mybatis-example?allowMultiQueries=true
- 数据库支持批量事务回滚,如果开发中发现不支持,一定是框架的问题。 分布式系统不支持批量sql事务
- sql复用片段
<include>
1
2
3
4
5
6
7
8
9
10
11
12
13
14
15
16
17
18
19
20
21
22
23
24
25
26
27
28
29
30
31
32
33
34
35
36
37
38
39
40
41
42
43
44
45
46
47
48
49
50
51
52
53
54
<select>
    select * from t_order where 1=1
    <if test="name != null">
        and name = #{name}
    </if>
    <if test="salary != null">
        and salary = #{salary}
    <if/>
</select>

<select>
    select * from t_order
    <where>
        <if test="name != null">
            and name = #{name}
        </if>
        <if test="salary != null">
            and salary = #{salary}
        <if/>
    <where/>
</select>

set 嵌套 if

<trim perfix="where"  prefixOverrides="and|or">
    <if>
        可实现where
    </if>
</trim>

<trim suffix=","  suffixOverrides="where id = #{id}">
    <if>
        可实现where
    </if>
</trim>

<where>
    <choose>
        <whem test="">
        </when>
        <when test="">
        </when>
        <otherwise>
        </oterwise>
    </choose>
</where>

<select>
    select * from t_tmp
        <foreach collection="ids" item="id" seperator="," open="where id IN (" close=")">
            #{id}
        <foreach/>
</select>
//如果是ids为null,加上if标签可避免报错
特殊字符
| 原字符 | 转义写法 |
|——–|———-|
| & | & |
| < | < |
| > | > |
| " | " |
| ' | ' |
缓存机制
- 默认一级缓存,同一个事务中的可以缓存
- 有时会缓存失效
- 两次查询之间有增删改
- 有时会缓存失效
- 二级缓存,在mapper里面写
<cache/>- 报错:二级缓存的机制底层是由序列化实现的,所以得实现Serilizable接口
插件机制Interceptor
- 报错:二级缓存的机制底层是由序列化实现的,所以得实现Serilizable接口
- ParameterHandler: 处理sql的参数对象
- ResultSetHandler: 处理sql返回结果集
- Statementhandler: 执行sql语句
- Executor : 执行器
分页插件PageHelper
- 导入
- 加入Bean:PageHelper
- 直接pageInfo
1
2
3
4
5
6
7
PageHelper.startPage(1,5);
//我们调用的方法,只要紧跟着startPage,就会分页查询
List<Emp> emps = empService.getAll();
PageInfo<Emp> info = new PageInfo<>(emps); //使用info包装一下

info.getPageNum();
info.get
配置
1
2
3
4
5
6
7
8
9
10
11
12
13
14
15
16
@Bean
public PageInterceptor getPageInterceptor() {
    var iterator = new PageInterceptor();
    Properties properties = new Properties();
    properties.setProperty("reasonable", "true"); //分页合理化,默认查P1,不会超过总页数大小
    iterator.setProperties(properties);
    return iterator;
}

@GetMapping
Result<PageInfo<AlertInfo>> alertInfoListPage(@RequestParam int begin,@RequestParam int size) {
    PageHelper.startPage(begin, size);
    List<AlertInfo> list = alterInfoService.getAllAlterInfo();
    PageInfo<AlertInfo> pageInfo = new PageInfo<>(list);
    return Result.ok(pageInfo);
}
逆向生成
SpringBoot
- 简化开发配置
- 简化部署
-
简化运维
- 场景启动器 spring-boot-start
- spring-boot-start-* 官方jar包
- *-spring-boot-start 第三方jar包
- 依赖管理 父项目没有管理版本,记得自己管理
自动配置
这里是原理讲解,老师给自己讲爽了,只说谁创建谁,依赖谁,用了谁。这里其实还是不懂原理,不懂设计思想,还得自己搞
修改数据源
Sping底层默认是HikariDataSource,我们如果想用其他数据库连接池就需要自己配置
- 方法一: 注入Bean,覆盖DataSource(在配置类里面写,然后return一个德鲁伊连接池)
- 方法二:spring.dataSource.type= 全类名
导入
@SpringBootConfiguration@EnableAutoConfiguration
Import(AutoConfigurationImportSelector.class)批量导入152个自动配置类XXXAutoConfiguration基于条件注解导入一堆组件
容器中大多数组件都是基于
@Conditional,你没有定义就给你一个,你给了就用你的 *@ComponentScan具体流程
1
2
   * `EnableConfigurationProperties(DataSourceProperties.class)`  * 配置文件  * 属性类
 * `@ConfigurationProperties(prefix="spring.datasource")`定义前缀
这里用一句话概况,就是配置类,或者说自定义组件是从配置类里面读取的数据
基础功能
属性绑定
@ConfigurationProperties(prefix="xxx")进行绑定-
@Component记得加入组件 - 也可以直接换种方法
@EnableConfigurationProperties(XXX.class)可以替代@Component
yaml文件
yaml文件有层级,比较好些
1
2
3
4
5
6
7
8
9
10
person:
    name: hzy
    birth: 2000/2/29
    child:
        - hzy1
        - hzy2
    dogs:
        - name: lele
          age: 1
        - {name:lele2,age:3}
application.properties 和 application.yaml 冲突了,application.properties优先
banner
spring.banner.location=classpath:banner.txt我们自定义启动时候打印的东西
————————————————————————————————————————————————————————————————————
//                          _ooOoo_                               //
//                         o8888888o                              //
//                         88" . "88                              //
//                         (| ^_^ |)                              //
//                         O\  =  /O                              //
//                      ____/`---'\____                           //
//                    .'  \\|     |//  `.                         //
//                   /  \\|||  :  |||//  \                        //
//                  /  _||||| -:- |||||-  \                       //
//                  |   | \\\  -  /// |   |                       //
//                  | \_|  ''\---/''  |   |                       //
//                  \  .-\__  `-`  ___/-. /                       //
//                ___`. .'  /--.--\  `. . ___                     //
//              ."" '<  `.___\_<|>_/___.'  >'"".                  //
//            | | :  `- \`.;`\ _ /`;.`/ - ` : | |                 //
//            \  \ `-.   \_ __\ /__ _/   .-` /  /                 //
//      ========`-.____`-.___\_____/___.-`____.-'========         //
//                           `=---='                              //
//      ^^^^^^^^^^^^^^^^^^^^^^^^^^^^^^^^^^^^^^^^^^^^^^^^^^        //
//            佛祖保佑       永不宕机     永无BUG                  //
————————————————————————————————————————————————————————————————————
应用启动
- 自己
new SpringApplication(XXX.class),之后可以用各种方法 new SpringApplicationBuilder().main(XXX.class)然后各种设置日志
- 日志门面
- JCL
SLF4j
- 日志实现
- Log4j
- JUL (过时了)
- Log4j2
Logback
spring底层用的就是上面那两个
记录
@Slf4j使用注解之后底层会给你一个log对象,直接用,不用new
- trace 追踪
- debug 调试
- info 信息
- warn 警告
- error 错误
日志级别
- ALL
- TRACE
- DEBUG
- INFO 默认
- WARN
- ERROR
- OFF
logging.level.root = debug 默认是info
日志分组
1
2
3
4
5
6
7
logging.level.root = info

logging.level.root.service = debug

logging.group.biz = com.hzy.service,com.hzy.controller

logging.level.biz = debug
其实在yaml里面配置更方便,想一想,这种层级都适合在yaml里面写
文件输出
logging.file.name = boot.log //会自己生成文件 logging.file.path =
文件归档与滚动切割
动态日志用{}占位,然后填值
| 配置项 | 描述 |
| —————————————————— | ——————————————————————— |
| logging.logback.rollingpolicy.file-name-pattern | 日志存档的文件名格式
默认值:${LOG_FILE}.%d{yyyy-MM-dd}.%i.gz |
| logging.logback.rollingpolicy.clean-history-on-start | 应用启动时是否清除以前存档;
默认值:false |
| logging.logback.rollingpolicy.max-file-size | 每个日志文件的最大大小;
默认值:10MB |
| logging.logback.rollingpolicy.total-size-cap | 日志文件被删除之前可以容纳的最大大小(默认值:0B);
设置 1GB 则磁盘存储超过 1GB 日志后会删除旧日志文件 |
| logging.logback.rollingpolicy.max-history | 日志文件保存的最大天数;
默认值:7 |
自定义配置
一般没必要,如有需要找ai生成一个
切换日志
先去pom里面去掉原来的日志,再加入新的日志
其他
Profile
- 配置类
- 配置文件
-
spring.profiles.active = dev
-
spring.profiles.
- 分组: 不做演示了
外部化配置
打好jar包之后,我们外部再搞application.properties可以覆盖
优先级排列:外部高于内部,但是激活优先
- 命令行
- /app/config/a
- /app/config
- /app
- jar包
单元测试
- 断言机制
- 使用
Assertion.assertEquals()进行断言 Assertion.Throws()
- 使用
断言有一堆方法,各种断言,用到再写就行
可观测性
- Metrics 指标
- Logging 日志
- Tracing 追踪
spring 提供了actuator
- 导入
spring-boot-starter-actuator management.endpoints.web.exposure.include = *- 然后访问
/actuator
生命周期
先跳过了
手写start,复用
Controller 层、Service 层的类, 都不需要、也不应该标注任何组件注册类注解。
第一层抽取
- 手搓子项目start
- 作为依赖引入start
- 父项目扫不到start的包,所以在start配置AppConfig导入
- 在AppConfig中创建Bean
@EnableConfigurationProperties(XXX.class)使得配置类Properties加载到Bean有效@Import自动配置类第二层抽取
``` java @Target({ElementType.TYPE}) @Retention(RetentionPolicy.RUNTIME) @Documented @Import(RobotAppConfig.class) public @interface EnableRobot{
}
1
2
3
##### 第三层只需要start
我们说springBoot有扫描152个自动配置类,所以我们也搞这个就好了
在
META-INF/spring/ └── org.springframework.boot.autoconfigure.AutoConfiguration.imports
1
2
3
4
5
6
7
8
9
10
11
12
13
14
15
16
17
18
19
20
21
22
23
24
25
26
27
28
29
30
31
32
33
34
35
36
37
38
39
40
41
42
在这个文件下直接写Configuration配置类的全类名

//记得复习springboo自动配置原理


### Mybatis Plus
#### 常见注解
`@TableName("tb_name")`

`@Tabled()` 可以指定type,定义主键生成方式

* IdType.AUTO
* idType.INPUT
* IdType.ASSIGN_UUID

`@TableField()`
* 名字不符合驼峰转换
* 名字是以is开头的也无法映射
* 对于含有关键字的要用“``”
* 对于不存在的要用exist = false

#### 常见配置
``` yaml
spring:
  datasource:
    type: com.zaxxer.hikari.HikariDataSource
    url: jdbc:mysql://8.152.100.169:3306/lease?useUnicode=true&characterEncoding=utf-8&useSSL=false&allowPublicKeyRetrieval=true&serverTimezone=GMT%2b8
    username: lease
    password: 123456
    hikari:
      connection-test-query: SELECT 1 # 自动检测连接
      connection-timeout: 60000 #数据库连接超时时间,默认30秒
      idle-timeout: 500000 #空闲连接存活最大时间,默认600000(10分钟)
      max-lifetime: 540000 #此属性控制池中连接的最长生命周期,值0表示无限生命周期,默认1800000即30分钟
      maximum-pool-size: 12 #连接池最大连接数,默认是10
      minimum-idle: 10 #最小空闲连接数量
      pool-name: SPHHikariPool # 连接池名称

#用于打印框架生成的sql语句,便于调试
mybatis-plus:
  configuration:
    log-impl: org.apache.ibatis.logging.stdout.StdOutImpl
通用Mapper
- BaseMapper
1
2
3
4
5
6
7
mapper.selectlist(queryWrapper);
mapper.selectlist(ipage,queryWrapper);
mapper.selectById(id);
mapper.insert(entity);   //返回影响行数
mapper.updateById(entity);
mapper.deleteById(1);
通用Service
get,save···
1
2
3
4
5
6
7
8
9
10
11
12
13
14
//这个方式很别扭,我们用接口去继承抽象类
//那么实现类就得重写很多方法
//我们不想自己写,就继承ServiceImpl
public class UserServiceImpl<UserMapper,User> extends ServiceImpl implements UserService{

}

public interface UserService extends IService<User>{

}

userService.getById();
userService.saveOrUpdate(entity); //id存在就更新,不存在就插入
userService.saveBatch(List.of(entity1,entity2));
条件构造器
AbstractWapper.Class
QueryWrapper
UpdateWrapper
LambdaQueryWrapper
1
2
3
4
5
6
7
8
9
10
11
12
13
14
15
16
17
18
19
20
21
22
23
24
25
26
wrapper1.gt("id",1);

wrapepr2.orderByDesc("age");

wrapper3.ge().le();

wrapper4.lt().or().gt();
//使用lambda表达式
wrapper5.like().and(wrapper_ -> wrapper_.it().or().gt())


UpdateWrapper<TCustomer> updateWrapper = new UpdateWrapper<>()
    .setSql("balance = balance - 200")
    .in("id",ids);

updatewrapper.eq("name","hzy").set("email","fsalkdhflak@df")

lambdaquerywrapepr.eq(User::getName,"hzy")

LambdaUpdateWrapper<TCustomer>  Wrapper = new LambdaUpdateWrapper<>()
    .setSql("balance = balance - 200")
    .in(TCustomer::getId,ids);
分页插件
1
2
3
4
5
6
7
8
9
10
11
12
13
14
15
16
17
18
19
//分页插件
@Configuration
public class MPConfiguration {

    @Bean
    public MybatisPlusInterceptor mybatisPlusInterceptor() {
        MybatisPlusInterceptor interceptor = new MybatisPlusInterceptor();
        interceptor.addInnerInterceptor(new PaginationInnerInterceptor(DbType.MYSQL));
        return interceptor;
    }
}

Ipage page1 = new Page<User>(2,3)
Ipage result = userService.page(page1);
result.getRecords().forEach(System.out::println)

userService.selectPage(page1,wrapepr1);

//自定义分页查询
